Archery
- I run our local club's web site.
- I'm a complete novice, I've only been shooting for two years.
- A Novice's Impression of Archery
- What a Day!
- Checklist vs. Pre-Shot Routine
- Back Tension
- Bow Physics
A Novice's Impression of Archery
I feel at liberty to write about my impressions of archery in the secure knowledge that any decent archer will quite rightly not bother to read them, you have been warned.
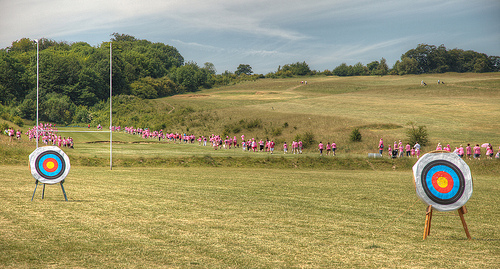
I do love archery though. It's a perfect combination of the mental and the physical. When you watch world class archers repeatedly hitting a target about the size and colour of a large grapefruit at seventy meters it makes you realize how far you have to go. It's quite a solitary sport in that you cannot (or at least should not try) to influence the performance of your competitors. The only way you can win is to focus on your own performance.
I shoot a compound bow. Currently it's wound up to its maximum 52lb draw weight and I'm thinking I need to replace it soon to work up to 59lb (60lb is the maximum weight allowed in FITA competitions.)
So much of archery is about repetition: learn to shoot a 10,
repeat.
But in order to achieve that repetition you need to
build up a routine that is much more mental than physical. The
ability to repeat is keyed on minituae of hand and body position,
and how do you remember from shot to shot, let alone from week to
week, exactly where your hand touches your face or exactly how the
bow sits in your hand?
A lot of that comes down to shooting form
. Where your
hand touches your face is called your anchor position
and
it is very important to be able to reproduce that. For a compound
shooter with a release aid it is recommended that you straddle your
jaw bone between the first and second fingers of your hand, then
the peep sight can fine tune that position. But it's very important
that the peep sight is set to where your anchor position naturally
falls, otherwise your hand will be wandering around your face trying
to make the peep sight fit.
On that note, today I reduced the draw length of my bow by a whole inch, and what a difference! It's like taking an ill-fitting suit to the tailors and having it fitted. I'd alredy adjusted my peep as discussed above, but something was still not right. basically the angle (back corner) of my jaw was between the tips of my second knuckles. Taking an inch off the draw length means my first and second fingers straddle the ridge of my jaw and the angle of my jaw sits neatly just in front of my first knuckles (nearest my palm.) It feels so much more stable that I can't wait to try it out. Unfortunately we couldn't shoot today because of high wind.
What a Day!
Conditions this sunday were "challenging": although not nearly as bad as last sunday it was still very windy and I didn't even beat my average score. However it was a great day because I was awarded both my third class and second class certificates, and a GNAS medal for the best handicap improvement in the club for 2010 (I went from 100 to 41.) I just hope I can keep my momentum going through 2011.
Checklist vs. Pre-Shot Routine
A lot of books on archery promote the use of a checklist
of
points about your form that you should run through as you are making the shot.
The idea is that you should go as far as writing the checklist out and
sticking it to the belly of your bow, so that you don't leave anything to chance.
Here's my checklist:
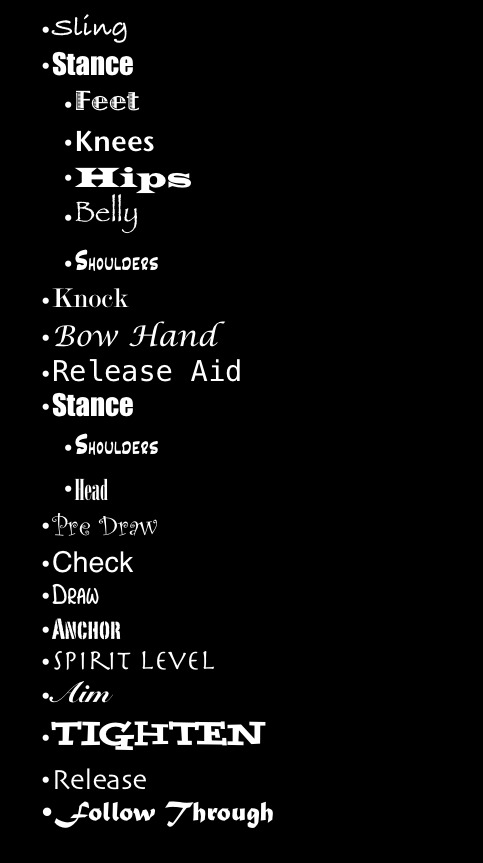
Now I have a bit of a problem: that's an awful lot of things to be thinking about while you are trying to hit the middle bit.
I recently came across a piece of advice that I think sounds much more
practical, and that is to develop a pre-shot routine
. The idea of
a pre-shot routine is that you mentally rehearse what it feels like to make
a good shot before you make each shot. The rehearsal can include a checklist if you like,
but it essentially is reinforcing your form subconsciously, so that you will
naturally be able to achieve that form when you step up to the line,
and be able to know intuitively when a shot feels wrong and you should come down and
try again rather than letting the shot go. I've been trying to use a pre-shot routine for the
last couple of weeks and I think it's starting to pay off.
Back Tension
Another buzz word in archery, Back Tension essentially means using the muscles of your shoulder blades to tighten the shot at full draw. I personally find it much easier to focus on the thing that my back tension is moving, namely my elbow rotating slightly further behind my head. This also lets me think about a good solid contact between my release-aid hand and my jawline.
Bow Physics
When drawing a simple longbow, the further back you pull it the harder it gets. If you were to draw a graph with how hard it is to pull going from bottom to top, and how far back you are pulling it going from left to right, then for a longbow it would look something like this:
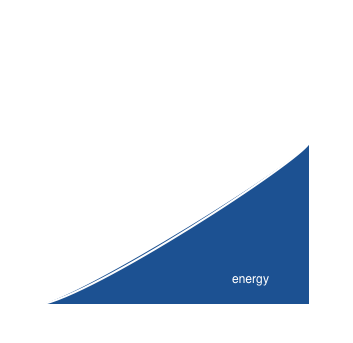
This is called a Force-Draw Curve (fdc.) You can see that the weight you are holding increases fairly linearly as you draw the bow back. Interestingly the energy stored in the bow, and therefore imparted to the arrow, is precisely the area under this curve.
The design of a recurve bow, with cleverly laminated limbs, significantly improves things. For a recurve, the graph will look more like this (the dotted line is the previous longbow graph.)
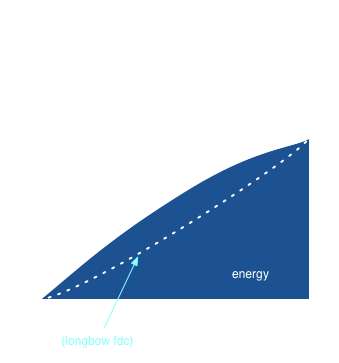
The design of the limbs means that although you still need more force to pull further back, the amount of force you need to add gradually lessens. Also the shape of the line means that the energy stored in the bow is higher, and therefore the maximum draw weight can be lower than for a longbow while still delivering an equal or greater impetus to the arrow (to be honest, a good longbow can approach this type of curve too, but the effect is much more marked for recurves.)
For a compound bow, the situation is much more complicated:

(The fdc of a typical recurve is shown for comparison.)
Compound bows are designed to give a constant draw weight
throughout the draw, ending with a let-off
so that you are
actually holding less weight at full draw than the maximum draw
weight. For this reason the maximum draw weight can be much higher
than either a longbow or a recurve, and that fact, combined with
the constant draw weight means that the energy stored in the bow
is much greater. Before going on to how this is done, I'd better
explain the diagram just a bit more.
The difference between a soft cam
and a hard cam
is just how quickly the bow reaches its maximum draw weight. A
softer cam is much more comfortable to draw, but as you can see
from the figure it does sacrifice some energy, and hence arrow
speed. You need a very steady draw to shoot a hard cam, otherwise
your arrows will be falling off the arrow rest with embarrasing
regularity.
The valley
is an archers term for the point of minimum
weight beyond the peak draw weight. The wall
is just the bow
up against the stops, you cannot pull past it. The let-off
technically, is the difference beween the weight in the valley and
the peak weight, divided by the peak weight and expressed as a
percentage. Most bows allow the let-off to be modified, as in the
figure.
So how does a compound bow achieve this? Well the basic idea behind any compound bow is a simple block and tackle. You may remember this from school physics lessons but here's a picture anyway.
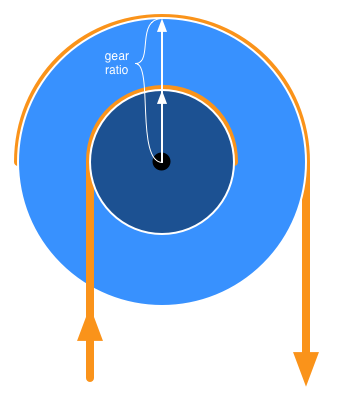
When you pull down on the rope attached to the outer wheel, both wheels rotate clockwise. Because the inner wheel has a smaller radius, the rope attached to the inner wheel does not move as far, but does so with equal energy, and so can pull that much harder. The ratio between the outer and the inner radii is essentially a gear ratio. The bigger that ratio, the less the inner wheel's rope moves and the harder it can pull.
Nw if we replace ropes with strings and cables, and put one of
these wheels on each end of a bow, we get the following twin
cam
setup:
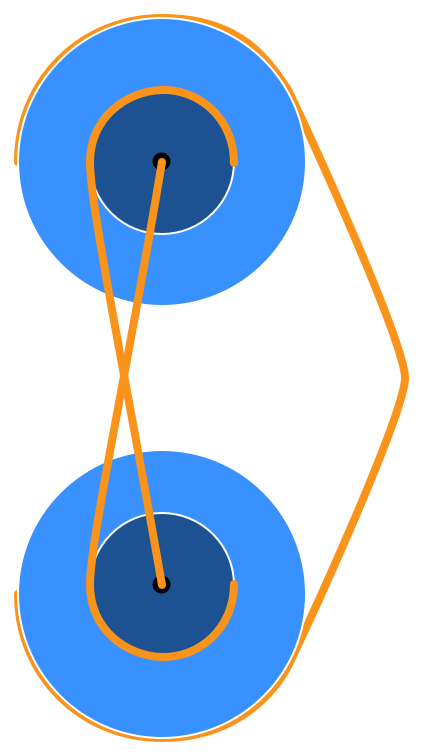
The cable attached to each inner wheel runs to the centre of the opposing wheel, and the single string connects both outer wheels.
Now this explains how a compound bow is able to pull its sprung steel limbs, but it doesn't explain that constant draw weight from the graph above. That requires one last refinement: for a compound bow, the wheels aren't circular.
Here's a picture of the upper cam of a compound bow at rest:
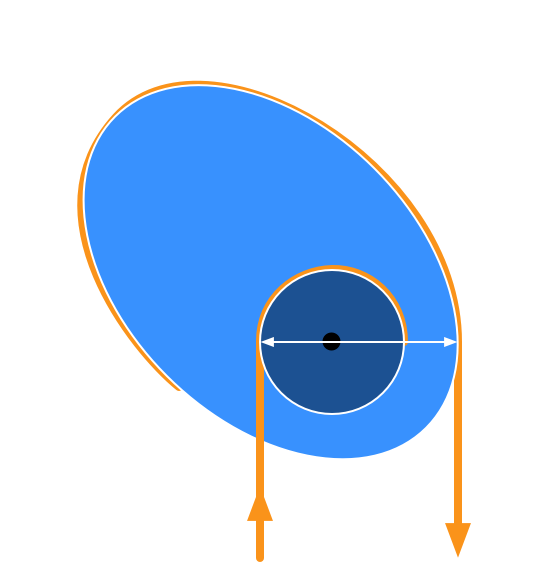
The outer cam has an oval shape, and is oriented so that at rest the gear ratio is quite low. The actual ratio at any moment is measured as the ratio between the radii at the point each cable makes contact with its wheel.
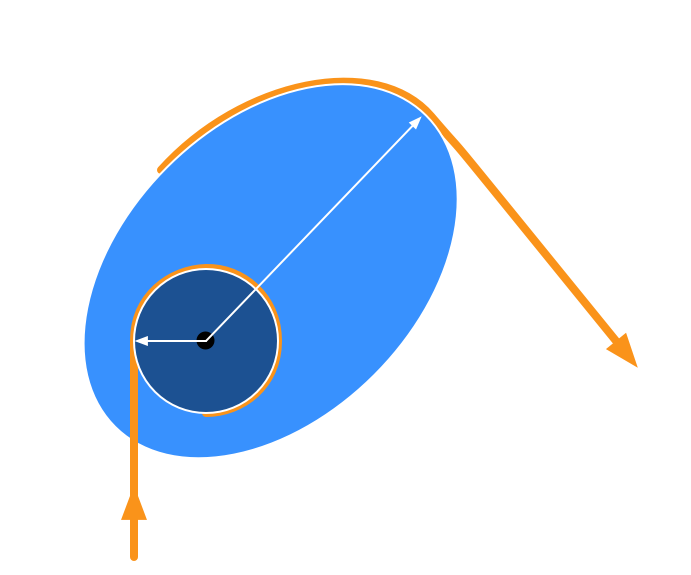
As the bow is drawn, the cam rotates clockwise so that a wider and wider radius applies to the outer wheel, and therefore a higher and higer gear ratio is in force. This compensates for the increased tension in the limbs, until at full draw it actually over-compensates, which provides the let-off:
I hope you've enjoyed this little article, and appreciate a bit more the advanced technologies that go into bow making. I should point out that the diagrams are not intended to be scientifically accurate or measured, they're just to give you an idea. Particularly, the precise shapes of the cams in a compound bow are designed to produce a specific draw weight curve, rather than being simple parabola, and the diameter of the inner cam is often made to vary too. I just didn't mention that above to keep things simple.